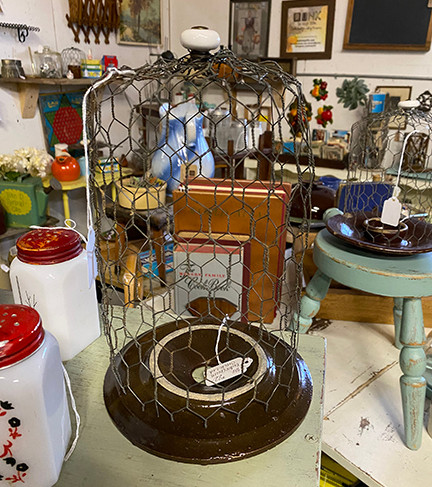
Chicken Wire Cloche
- Robin Brown
- Oct 6, 2022
- 4 min read
I have had this idea noodling around in my head for a while now. I think everyone has seen glass cloches in all the decorating magazines. Older ones are not only hard to find, but they are expensive when you do find them. I wanted to create a cloche with a different material—chicken wire.

When this idea first started noodling, I looked at buying new chicken wire, but that was the problem—it was new. I wanted it to look like it had been out on the farm for a while. I would find some chicken wire here and there, but there was never enough to make one cloche, let alone multiple. Then a couple of years ago, I found this huge roll of chicken wire at a farm auction. It had never been used, but it had been in the barn for a while and it had just the right look. I probably could have bought the new roll and just left it outdoors for a few months.

In addition to the chicken wire, you will need some wire to attach the knob. You can find this in the floral department of a big box store or craft store. A couple of tools you will need are a pair of needle-nose pliers and wire cutters. You will also need band-aids and an up-to-date Tetanus shot. I think anyone that works with rusty things on a regular basis keeps up with the shots.

The first one I was was purely by trial and error. I figured I had plenty of wire so I just started playing with it. I unrolled the chicken wire and cut a strip. I used the wire cutters to a strip. I cut in the middle of the hexagon.

This one I used a height of 7 loops. I made about a dozen of these and would change up the height of the cloches, so use your own judgement when determining how much cut.

I formed a cylinder to determine the diameter of the cloche.

I cut the wire to the accommodate the diameter of the cloche. I left these "tails" to give me some wire to twist around the other side to form the cylinder.

I formed the cylinder by overlapping one hexagon.

I used the needle-nose pliers to wrap the "tails" and secure the the cylinder.

Once the "tails" are secured along the entire length of the edge, you can begin to form the dome of the cloche.

I put one hand on the underside of the cylinder and began bending (about two hexagons height) toward the center of the cylinder. I worked my way around until the tips met in the middle. This is the part where the more cloches I made, I got better at this part. My first couple were not perfect.

For the knob on my cloches, I selected these porcelain knobs. Select a knob that has a definitive edge on the bottom. You will need this to wrap the wire around to secure it to the cloche. Of course, I removed the screw portion. You won't need it.

Side note, I had picked up a bag of these at a yard sale for a quarter. You can order them off of Amazon (link in my Amazon list below). It only had six in the bag. Fortunately, in the midst of creating these, I found another bag at an estate sale that had about a dozen in the bag.

Use the floral wire to weave around the points to close the dome. After the dome is secure, continue with the wire and wrap around the knob, loop through one side of the chicken wire, wrap around the knob again, and loop through another side of the chicken wire. I did this several times and anchored it it about six places on the chicken wire. The knob was secure at this point. I cut the wire and twisted the end to secure it.

Again, this was by trial and error, but it seems to work. Notice the bandage on my finger in this pic.

I love how this turned out. It can be used with any seasonal decor.
I didn't have bases for my cloches. I actually didn't think they needed it. As I was putting them in my booth, my friend (and fellow vendor) said she would use them with terra cotta planter bases. I thought that was a great idea! Then I remembered I had crock lids in my booth. They were a perfect fit for these! This also shows that some of the cloches were short and squatty and some were taller.
Thank you for reading my blog! If you would like to see more, follow me on Facebook, Instagram,and Pinterest! Just click on any of the social media links above! Thanks for following me on the junking adventures!
Below are some links to products I used in this project. Disclaimer: Junk is My Life is a participant in the Amazon Services LLC Associates Program, an affiliate advertising program designed to provide a means for sites to earn advertising fees by advertising and linking to Amazon.com.
Update: A really great blog, Life of a LEO Wife recently featured this project on her blog.
Her blog is awesome! Check it out: Life of a LEO Wife
This project was also featured on the The Answer is Chocolate blog!
Check out Carol's blog—The Answer is Chocolate!
Below is an image to pin to Pinterest if you would like to save this idea!


Comments