
Triple Project Trunk Upcycle
- Jun 6, 2023
- 4 min read
Updated: Jul 24, 2023
A few weeks ago, I was at an auction. They didn't have a lot that I wanted to purchase, but I did spy a couple of trunks. They were in pretty bad shape, the lids were not attached, they were kind of a mess. I was only going to purchase one that was in less worse shape than the other, but I ended up with both. This post is about how I upcycled one of the trunks.

This is the first trunk. I don't know if you can tell, but part of the back of the trunk is not attached to the trunk. It was laying off to the side. I had to repair that for one of the projects. I thought about restoring the trunk, but hump-back trunks are difficult to sell so I decided to up-cycle the trunk into some wall decor. I have done that with some other trunks in the past. You can see those projects here and here, and I almost forgot about this one.
On a side note, my brother restores trunks and he did a guest post about a trunk he restored to showcase his military service. You can find that here.
For this project, you will need:
• Ruler/Measuring Tape
• Pencil
• Circular Saw/Power Drill: I use the Black & Decker Matrix System
• Assorted Wood Screws
• Assortment of Sandpaper
• Varathane Polyurethane: I use the satin finish.
• Brushes to apply the polyurethane
• Assortment of Coat Hooks: I purchased the ones used in this project at Hobby Lobby (make sure to catch the 50% off sales).
• French Cleats: For hanging on the wall


I wanted to cut down the base of the trunk to use the front and back for wall decor. The depth was about 3 inches. It varied on each side because I wanted to avoid metal straps and existing nails, etc. I used a circular saw to make the cuts.

The photo above shows the front portion of the trunk after it has been cut down. I sanded the rough edges and any of the flat areas that were rough.

I used the scrap from the bottom of the trunk to cut a piece to fill the gap (where the trunk was open for storage). This is not a critical step, you could leave it open, but I like to have a small shelf on the top end so you can add small pieces of decor.

I also cut a piece (approx 4") for the back. This is where I will add a French cleat to hang on the wall. I did this with both the front and back portions of the trunk. I didn't have enough wood from the bottom of the trunk to do this so I used a piece of MDF. I used small nails to attach to the trunk.
Finishing the Front of the Trunk

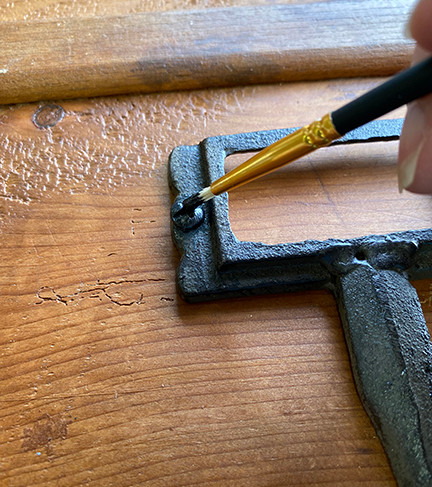
There were some screws missing on the metal straps on the trunk. I secured them with wood screws. I use acrylic paint to make the screw blend with the old metal.

I coated the entire piece (wood and metal) with Varathane Crystal Clear Polyurethane in the Satin finish.

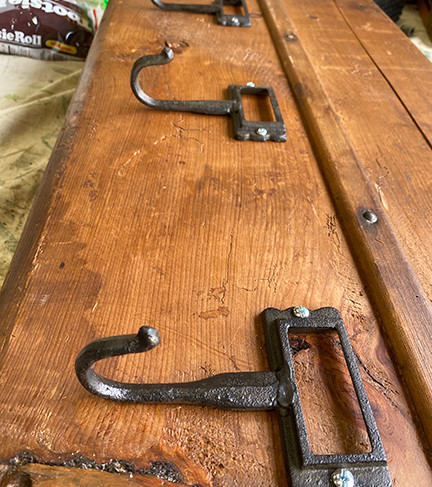
These hooks from Hobby Lobby matched the existing metal on the trunk pretty well. I decided to use three for the front of the trunk.


I measured and marked the placement for each one and drilled the holes. I used a screw and a nut to bolt each one on the trunk. I like to use a screw with a bolt to secure the hook because I feel if you actually hand a coat on the hook, it would be less likely to pull the hook off if it bolted down rather than just screwed in with no bolt.


Again, I used the acrylic paint (Folk Art Brush Metal in Brushed Black) to make the new screw match the color of the hook. It actually makes the screw blend right in.
I added a French cleat (18 inch) to the back (and to the wall) to be able to hang this piece securely.
Finishing the back section of the trunk

I coated the entire piece (wood and metal) with Varathane Crystal Clear Polyurethane in the Satin finish.

I chose these hooks from Hobby Lobby again, because they matched the existing metal on the trunk pretty well. I decided to use three for the front of the trunk.


I measured and marked the placement for each one and drilled the holes. I used a screw and a nut to bolt each one on the trunk.

I used the Folk Art Brushed Metal (Brushed Black) to paint the screws to match the metal hook. I added a French cleat (18 inch) to the back (and to the wall) to be able to hang this piece securely.
Finishing the Top of the Trunk
The top of the trunk is the third piece of the puzzle here. It needed a little less construction.

I used a scrap piece of wood to add a back to the top of the trunk. I don't have step by step photos for this one. I coated the entire piece (wood and metal) with Varathane Crystal Clear Polyurethane in the Satin finish. I chose hooks that look like silverware for this piece. I added a French cleat (18 inch) to the back (and to the wall) to be able to hang this piece securely.
The Finished Pieces

This is the front portion of the trunk. The wood I added at the top makes a nice shelf for small knick-knacks. The hooks look like they have always been there.

This is the back portion of the trunk. Again, the wood added to the top lends itself to accommodating additional decor.

This is the top of the trunk. Since this was a hump-back trunk, it curves outward a bit.
So go ahead, pick up that trunk that is falling apart. It can have a new life again—in this case, three new lives!
Thank you for reading my blog! If you would like to see more, follow me on Facebook, Instagram,and Pinterest! Just click on any of the social media links above! Thanks for following me on the junking adventures!
Below are some links to products I used in this project. Disclaimer: Junk is My Life is a participant in the Amazon Services LLC Associates Program, an affiliate advertising program designed to provide a means for sites to earn advertising fees by advertising and linking to Amazon.com.

Below is an image to pin to Pinterest if you would like to save this idea!


Comments