
Spoon Carved Desk Makeover
- Mar 26, 2023
- 3 min read
This poor desk. She had certainly seen better days. She was beaten up and battered, and spattered with paint for that matter. She was sitting out in the February winter in Northern Indiana when I found her. Time to scoop her up and bring her in for a makeover.

For the most part, this table was pretty sturdy. It had great some great details.

You can almost see the design on the drawer pull. Scroll down to see how neat it is!

On the back side of the desk it was missing the corner detail where the legs meet the base.


I wish I could have kept it, but to make it look balanced, I removed the remaining one. It came off really easily when I pried it apart with a scraper. It really improved the overall look.


The front of the desk had the same issue. One of the sides was missing the corbel detail. I wish I could have brought the one from the back and attached it to the other side, but although it was the same design, it was the wrong side. Both had the right side missing and obviously the left side wouldn't have worked on the front. Again, it came off really easily.

The drawer practically fell apart when I pulled it out. Fortunately it just needed to be re-glued. I added the glue and applied the wood clamps and let it dry for a couple of days.
I began to assemble the items I needed for this project.
Wood Clamps—I used them on this project to re-glue the drawer.
Rustoleum Milk Paint—I used the Eclipse color
I knew I was going to paint the base, but I was hoping to sand the top and just stain it. Unfortunately it was gouged in several places and had holes in three or four places. I even removed a screw from one of the holes. I don't know what was attached to the top and the holes were in the most random places.

I used wood filler to repair the top. After it dried for a couple of days, I sanded it smooth.


I gave the piece two coats of the Rustoleum Milk Paint in the Eclipse color. I painted the top and the drawer as well.


After the paint has dried for 24 hours (it was actually about a week before I got back to it), I used 60 grit sandpaper to really rough up the paint and heavily distress the piece. I wiped it down with a damp cloth to get rid of the dust. I sealed the piece with the Varathane Crystal Clear polyurethane in the satin finish.


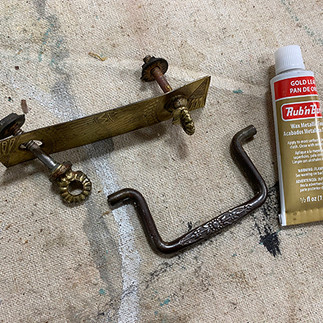

I thought about putting a different pull on the drawer, but the detail of this piece intrigued me. I wanted to see if I could bring it back. I used a wire brush on the backplate and it was really effective on the plate. The pull needed a little more help so I used Rub'nBuff to make it match the backplate.

I am glad I kept the original pull. I like the shine juxtaposed with the distressed black paint.

I really love how it turned out! I don't even mind that I had to paint the top of the desk. The damage and roughness of the desk is actually enhanced by the distressed paint. And the brass drawer pull just adds a little something—don'tcha think?
Thank you for reading my blog! If you would like to see more, follow me on Facebook, Instagram,and Pinterest! Just click on any of the social media links above! Thanks for following me on the junking adventures!
Below are some links to products I used in this project. Disclaimer: Junk is My Life is a participant in the Amazon Services LLC Associates Program, an affiliate advertising program designed to provide a means for sites to earn advertising fees by advertising and linking to Amazon.com.

Below is an image to save to Pinterest!


This is just a stunning transformation. I'm featuring it when my link party opens tonight.